How is time recording started and stopped?
This can be done manually by the employee, automatically by scanning or by a combination of both methods. The following practical examples are intended to illustrate this:
- At the start of the shift, the employee scans a checkpoint at the gate to start time recording. At the end of the shift, they stop time recording by scanning the same checkpoint.
- At the start of the shift, the employee scans a checkpoint at the gate and starts the time recording process. As he has to end the shift unexpectedly in between, he stops the time recording manually via the app.
-
There are no checkpoints in the property yet, which is why the employee starts and ends time recording manually.
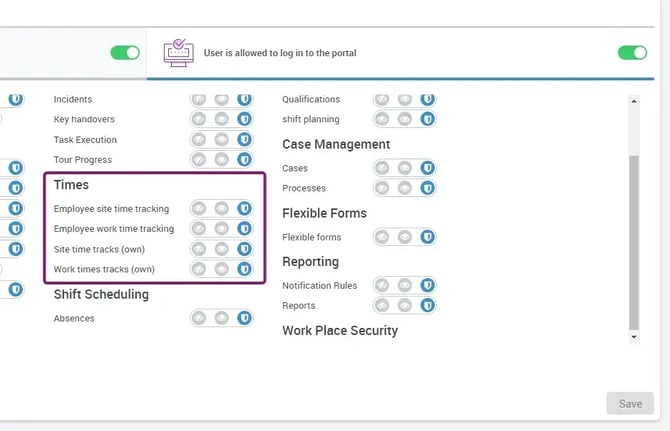
You decide whether the employee can also start and end their times themselves within the app. This is controlled via the COREDINATE authorisation system. If the employee has the View area time module or View working time module authorisation, they can start and end times themselves via the app. If you only want this to be possible by scanning a specific checkpoint, simply remove this authorisation. You can find out how to do this in the next section!
Start and end of recording automatically by checkpoint scan
In this case, COREDINATE takes over the thinking and automatically starts or stops the time recording whenever a specific checkpoint is scanned. You can easily determine which checkpoint this is by following the steps below:
- In the portal, open the relevant customer in which the desired checkpoint is attached (master data – clients).
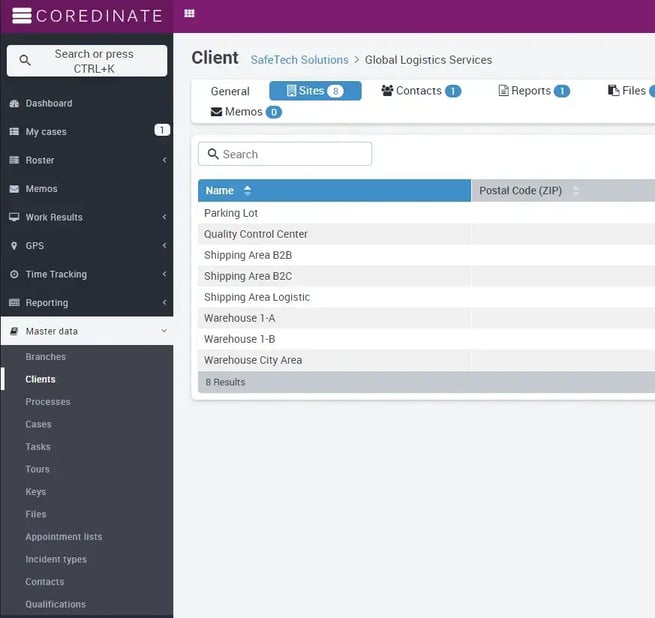
- Open the relevant area within the customer (e.g. Münster plant).
- Within the area, open the checkpoint that is to start and/or end the time recording in future.
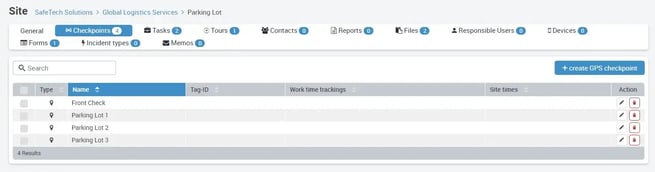
- In the detailed view of the control point, you will find the following area at the top right:
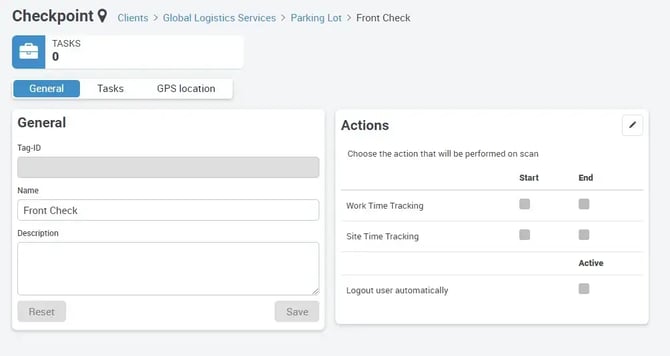
5. Click on the pencil in the top right-hand corner to access the editing view
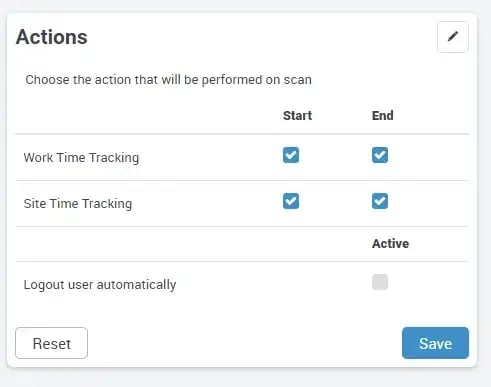
6. The edit view opens and you can specify exactly for the previously selected checkpoint whether the working time and/or area time starts or ends with a scan. It is possible for a single checkpoint to both start and end time recording. If a check mark is set for both start and end, COREDINATE starts the recording with the first scan of this checkpoint and ends the recording with the second scan.
Start and end of recording by manual booking via app
If you wish, your employees can also start and stop time recording manually via the app. Of course, this assumes that your employees think accordingly and also press the button in the app when the time recording is to start or end. If you have any concerns here, we recommend the automatic option mentioned above. In order for your employees to be able to book their times manually in the app, they need the corresponding right in the user administration. You can manage this right as follows:
-
Open the Users area in the portal under Administration.
-
Open the respective employee by clicking on the name.
-
In the detailed view of the user profile, you will find the roles and rights section on the right.
-
Click on the pencil in the top right-hand corner to access the editing view.
-
Now specify in the area that affects the rights within the app whether the employee should have access to the working time and/or area time recording.

The individual employee can no longer make any changes to the recorded times via the app! They can only start, pause and end the times. Nevertheless, subsequent corrections or even additions can be made via the portal. You can find out how to do this in the next section.
Start and end of recording by manual booking via the portal
As with almost all COREDINATE entries, you can make corrections via the portal if necessary, provided you have the appropriate rights. Proceed as follows:
-
Make sure that you have the appropriate rights in the portal under Administration/ Users (the respective time recording must be set to Manage, otherwise no new entries or changes can be made).
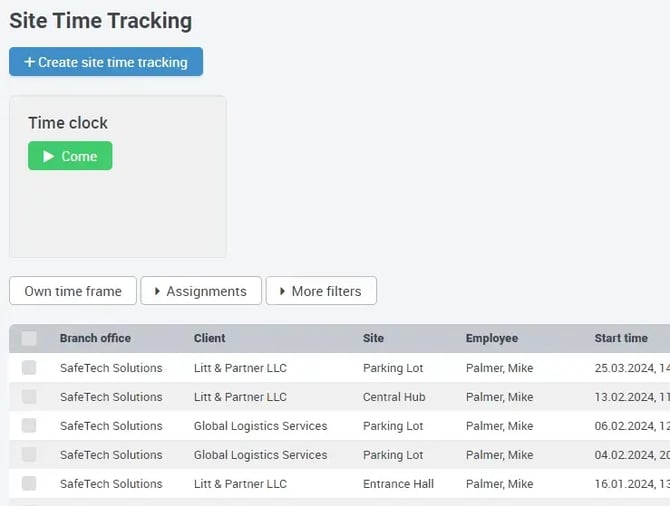
2. In the portal, switch to the Times section in the main menu on the left and then to Working time recording or Area time recording (depending on what you want to record).
3. A list of all times recorded to date will open, now click on the blue +Create site time tracking button at the top left.
4. A dialog now opens in which you first select the employee for whom the times are to be recorded – in the case of area time, select the area and the employee here.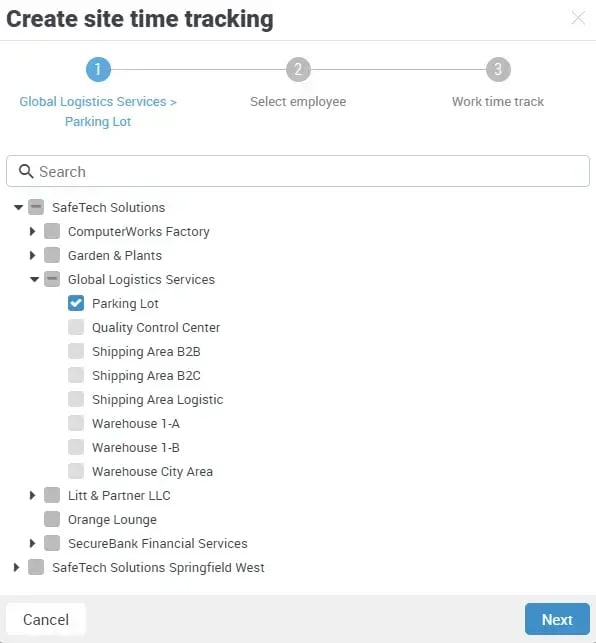
Once you have selected the desired area and the desired employee, enter the start time and date in the following window and click on Save.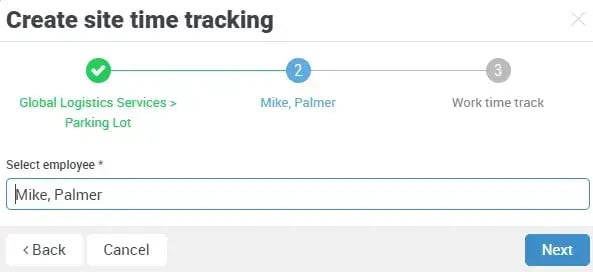
5. After you have clicked on Save, the time recording is started directly.
6. You can end the recording at any time by pressing the stop button at the end of the newly inserted line.
Of course, the time recording you have started via the portal can also be deleted or edited at any time. You can find out how this works in one of the next sections!
Working time recording in series through automatic sign-off
You can also use COREDINATE to record working time in rows. Place a smartphone in the entrance area of your company and let your employees start their working time when they enter and end it when they leave. Thanks to COREDINATE's automatic sign-out function, this is also possible for many employees in quick succession. There is a practical function in the COREDINATE portal so that the last employee does not have to log out before the next employee can record their working time. You can assign the Automatically log out user property to each checkpoint, which then has exactly this effect: as soon as one of your employees scans this checkpoint, they are logged out and the next employee can log in. This also ensures that no unauthorised work is carried out on the device after it has been logged in and left behind.
And this is how it works:
-
In the portal, click on Master data in the main menu and then on Clients.
-
Click to open the customer and then the area in which the relevant checkpoint is located.
-
Click to open the control point to which you want to assign the feature.
-
The detailed view for the control point opens with the Functions area.

5. Open the editing view by clicking on the pencil in the top right-hand corner.
6. Set the switch next to Automatically log out user to Yes.

From now on, the current user will always be logged out of the app when they scan this checkpoint.
You should NOT use these working time checkpoints with automatic logout in a tour, as you could never complete this tour because the employee is always logged out when the checkpoint is scanned!
If you use separate checkpoints for time recording, time recording only starts once (e.g. 08:00, even if you scan this checkpoint again at 08:05) and is only stopped when you scan the go checkpoint or click on the stop symbol in the portal. If you only use one checkpoint for logging in and out, time recording is started with the first scan and stopped again with the second scan. However, there is a risk that the employee scans the checkpoint twice in succession, which means that the time is stopped again immediately and the employee has no time recording for the day.
View recorded working times
Whether started automatically or manually: All time recordings end up in the portal. You can easily view these recordings as follows:
-
In the portal, first open Times in the main menu on the left and then Work or Area Time tracking.
-
A list opens, now set the desired criteria in the filter bar (e.g. employee and/or time period). If no filters are set, COREDINATE displays all recorded times of all employees chronologically (here: area time).
-
As soon as the desired criteria have been selected and there are records that match your criteria, you will see such a list.
COREDINATE not only displays the start (start time) and end (end time) of the working or area time. If breaks and the end of the working or area time have already been recorded, COREDINATE calculates the difference and displays the duration of the time block under Working time or Area time in the respective columns. If you make a change to the times or record times completely via the portal, such times are displayed as Changed. By clicking on the line of the changed time, you can see who made which change and when.
This means you can always see when times have been created or changed manually. If you want to create a report, you have the option of leaving the status Changed out of the report, for example. Please read here to find out how this works.