Create new user
If you have the appropriate rights in the portal, you can create new users for the application of COREDINATE at any time and without limits. The following steps show how to do this:
1. Log in to the portal.
2. Click on Administration on the left side of the main menu and then on Users.
3. A list of all users that have been created so far will now open.
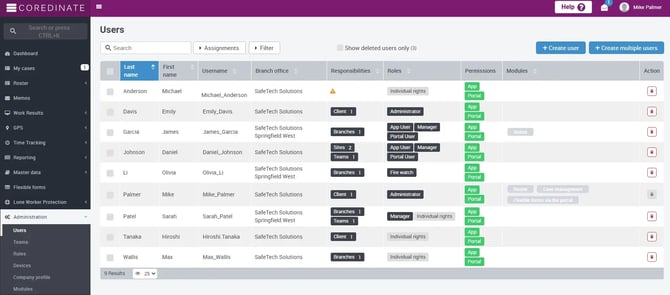
4. Now click on + Create user right above this list.
5. A window will open where you must first set the assignment:
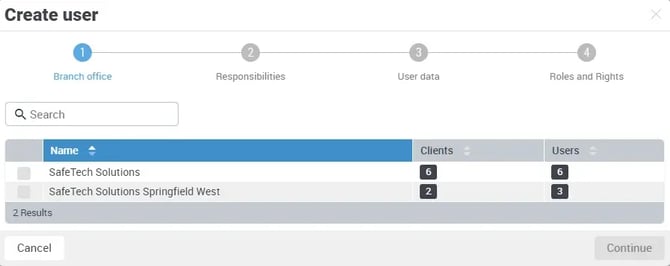

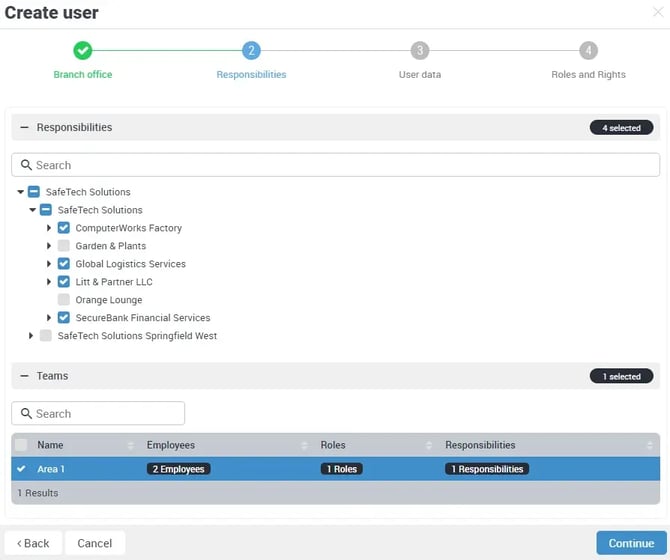
You can assign a user to your company, a customer, and/or an area, and you can also assign that user to one or more teams, if you have created teams. (How to create a team and what it is good for, you can read LINK here read more)

Depending on whether, for example, it is a customer who should have access to the portal, the correct assignments must be set so that your customer sees only what concerns him.
An employee who works at changing objects should be assigned directly to your company, or to the respective areas, so that he can perform his duties there.
You must assign a customer to the object of the customer who is to have access to the portal!
If you set the assignment incorrectly, it is possible that your customer can see everything company-wide, i.e. from all your customers and objects!
After clicking Continue you will see the user data window, where you should enter the user's data:

The assignment of the e-mail address is not mandatory, because you assign a password, which can be requested from you or overwritten by you in case of an event.
However, it makes sense to specify an e-mail address, as the user can then have a new password sent via e-mail if his password is lost.
Please note that for security reasons, we require eight characters, two lowercase letters, two uppercase letters and two numbers (the order of this combination does not matter).
COREDINATE checks already during the input whether these conditions are present and shows fulfilled conditions in green, not fulfilled in orange color. Only when all conditions are displayed in green, a sufficiently secure password is assigned (which you have to confirm again) and the user can be created. In your own interest, please also choose a password that cannot be derived or guessed too easily! Now select the rights that the user should receive in the following popup.
To do this, please click on the icons for the portal and/ or the app and simply select the required rights by predefined roles or individually.
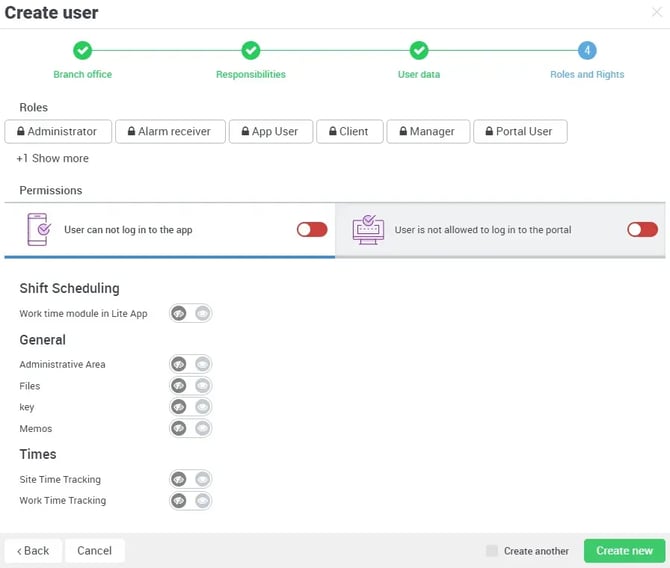
Here the user cannot log in anywhere yet. Only in the following, when rights are selected – This can be set by the predefined roles, but also by individual rights – the user can see or change things in the portal according to the assigned rights (e.g. manage) or, as in our example, log in to the app, receive only messages and files.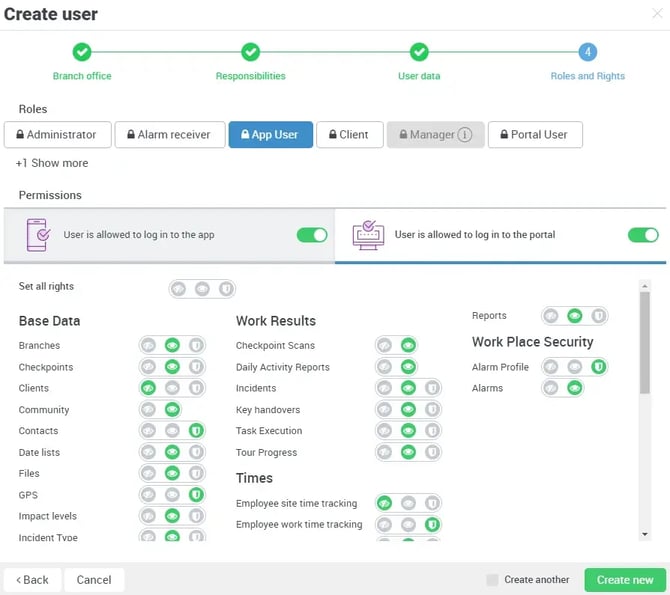
You can assign individual rights if you do not click on a predefined role, but simply click on the respective in the middle of the window, which then has all rights set to do not see directly below it. Then select the desired individual rights that the user should get.
However, if you do not assign individual rights, the employee can log in to the app and perform his or her duties correctly. So it can still scan checkpoints, perform walkthroughs, complete tasks, and also capture events.
Once the user has been saved by clicking on Create, we are taken directly to the detail view of the new user, which can be divided into the following components:
General overview
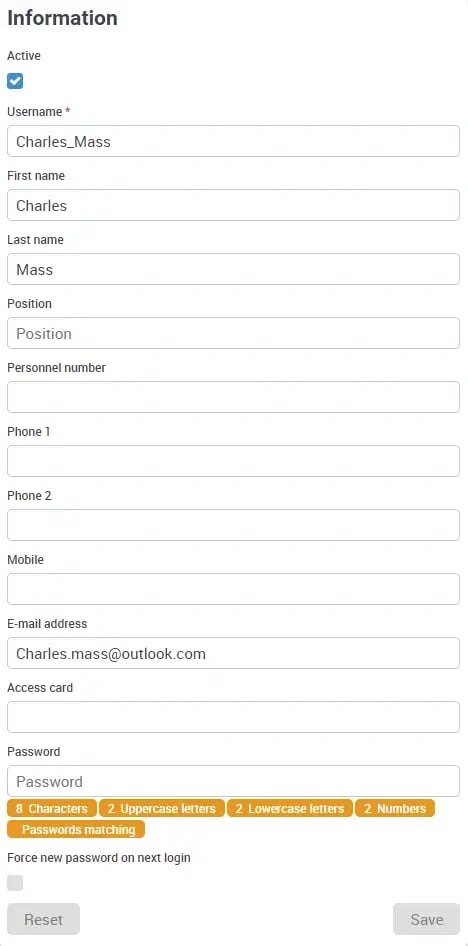
There is an option that when you create a new user, you can choose whether he has to change his password at the first login. To do this, simply activate the checkbox Force new password on next login.
Now the user must change his password at the first login.
Assignments overview

Here you can view the customers or objects where the user is assigned and change them if necessary.
You can also assign the user to a team or remove him from a team at this point (click on the pencil icon on the right and then simply remove the check mark in front of the team again, then click on Save). See also the article Teams.
Rights overview
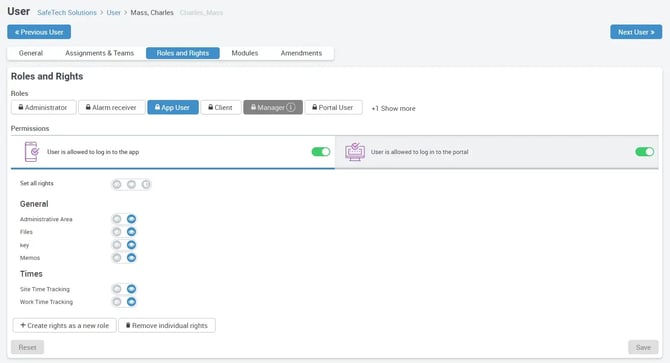
The rights can also be edited later, should this be necessary for this user.
Customer access to the portal
If you want to give one of your customers access to the portal, please pay special attention to the assignment of the user– the user assignment must be chosen so that he can see only his own areas.
If you forget to set this user assignment here, your customer, to whom you have granted access to the portal, can see company-wide, i.e. all customers and areas and all entries that are managed by your company, although he should actually only see customer A/area A.