You can use our roster to plan shifts, vacations, sick leave and other attendances and absences. This is how you can activate the roster.
The roster must first be activated in the portal under Administration -> Modules.

If you have not yet had a test phase for the roster module, you can test the module with all functions here for 14 days without obligation. If you have already had a test phase and it has expired, you can book the module here for a fee:

After clicking on the Book module button, you will see a message:

If you now click on Book with costs, a pop-up will appear to confirm the booking:

Now close the window by clicking on OK.
After booking you see the following view and you can cancel the module.

With the duty roster module activated, employees who have the roster module active can download the app to their private mobile devices and view all the shifts to which they are assigned. It is also possible to request absences such as illness, vacation, etc. in this app. Requests to swap shifts can also be made in the app and employees can clock in to shifts, i.e. start and end time recording, provided they have been given the right to do so in the portal.
Preparation of employees for the duty roster:
After activating the module, the roster module must be activated for employees under Administration -> Users if they have access to their own shifts etc. and are to be included in shifts.
You can conveniently book the duty roster module for employees in one go or activate the module individually for each employee.
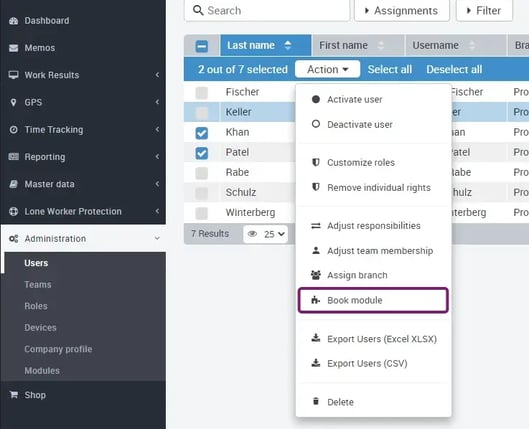
Several employees at once:
Simply check the box to the left of the employee's name. Once all the desired MAs have been selected, click on the Action button in the blue line at the top and select Book module from the following drop-down menu.
In the following window, the employees created in the portal are listed again, here you can see once more who should receive the module.


After clicking on Book with costs, the booked modules of the employees are immediately active and the employees can be planned in the shifts.
For individual employees, click on the desired employee name, then on the Modules tab and then on the Book button in the Roster module.

A message will appear, on which you must click on Book to activate the module for this employee.
If the duty roster module is booked for an employee, additional tabs are added to their profile.
These are:
- Vacation contingents
The amount of leave available to an employee must be entered here. If this entry remains blank, no leave can be requested. - Qualifications
You can enter various qualifications, such as §34a. When creating or assigning a qualification, you can also specify here whether it can expire or is always valid. - Contract data
At this point, you can enter monthly minimum and maximum hourly rates for the employee, define weekly working hours or enter break and rest times.
The duty planner menu is structured as follows:
- Overview
- Shift planning
- My shifts
- My absences
- My time tracking
- My availabilities
- My vacation entitlement
- Shift exchange
- Shifts
- Absences
- Time tracking
- Settings
Overview:
If employees wish to swap a shift or duty, this is shown here in the overview. It can also be displayed here at a glance if employees request absences. If a swap is offered and an employee offers to swap, approval is granted here by an authorized person (the swap is confirmed and the employee who has accepted the swap is entered in the shift instead).
Shift planning:
A good overview of all shifts in the form of a calendar helps you to plan according to your own needs. Here you can create your shifts and assign the required employees to the respective shifts. If qualifications are required for the shift that an employee does not meet, you will receive a warning message, but you can still add the employee.
My shifts:
The shifts you are assigned to are displayed here. You can also offer a shift or a day of the shift for exchange on the right under Action.
Option 1: You do not yet know which employee can cover for you in this shift or on this day.
Option 2: An employee has offered to take over the day or shift. This can be explicitly selected here. A swap usually requires the approval of an authorized person (e.g. shift supervisor).
My absences:
In this menu item, you can enter or view your own absences, provided you have the authorization to do so. Depending on the type of absence you want to enter, this may need to be approved first. You can also set up synchronization with your Microsoft Office account in this menu item. If you activate synchronization, you must first log in to your Microsoft account in the following step (other accounts are not yet supported). You can also see at a glance how many vacation days you have in total, how many of them have been used and how often you have been sick.
My time records:
You can see how long and how much the logged-in employee has worked under My time records.
My availabilities:
Enter here when you can work whole days or parts of a day.
My vacation entitlement:
Here you can see the period for which you have how many days of vacation and how much of it you have already used.
Shift exchange:
It is possible to swap shifts to ensure a better distribution among the employees.
Layers:
This is the menu item where all created shifts are listed along with the most important information about the shifts.
Absences:
Here you can see the absences of all employees at a glance and which absence types are involved or how long the absence lasts or lasted.
Time recording:
The working hours of employees can be viewed here. Clicking on an employee takes you to the detailed view, where you can also view overtime and other useful statistics.
Settings:
In the settings:
- absence types and whether these require approval if they are entered by the user.
- Wage type groups (not yet published) are defined in a further tab, which can later be assigned to employees (e.g. Saturday, Sunday or public holiday bonuses). These can also be created with wage type numbers, also from DATEV, or with special key numbers, which can then be used when exporting to other software.
- Rules are used to create break times as well as rest periods that must at least be observed for a certain amount of working time. The system then automatically deducts the breaks or adjusts them if the employee takes fewer breaks than specified.